Map and Compass
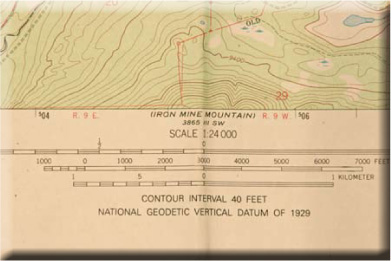
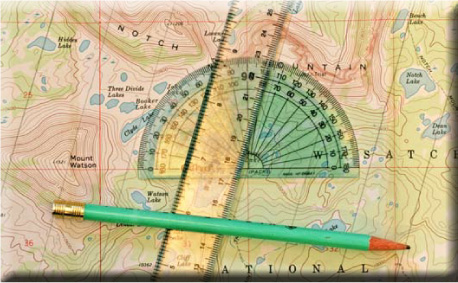
My preferred map is a U.S. Geological survey contour map. I find the most useful scale for hiking is 1:24,000. One mile equals 2 5/8 inches or one kilometer about four centimeters. The map is marked in red squares each of which is one square mile. The contour interval is 40 feet. The green areas on the map are forested areas and the white areas have no trees. The lakes are blue; the swampy areas are clearly marked; the streams are blue; all highways, the improved and unimproved roads, are also marked. The forest service trails and the named lakes and mountain peaks are labeled. With the map I can have confidence that I can find my way.
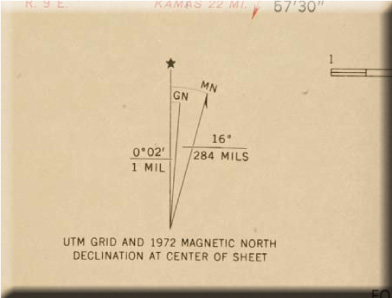
Declination is the deviation between true north or grid north and magnetic north. Grid north is marked as GN and magnetic north is marked as MN. The difference between grid north and magnetic north is known as declination. The degrees of declination should be printed on the map as shown on the illustration. Here it is 16° toward the east. In the western United States the declination is towards the east while in the eastern United States the declination is towards the west. All good maps clearly mark the grid north, the magnetic north and the degrees of declination because they are essential for using a compass. When using a compass you must adjust the direction by the amount of declination. Failing to take into account the declination can put you off course by the degree of declination in your area and this could put you many miles off course on a long trek.
Set your compass adjacent to the declination portion of your map. Direct the red arrow on the base of the compass on grid north or true north on the map. Now rotate the map and compass until the compass’s needle points to north. Now adjust the compass so that the declination is 16° towards the east. Now you have both the map and compass directly oriented towards grid north and magnetic north. The compass’s needle points towards magnetic north while its base points to grid north.
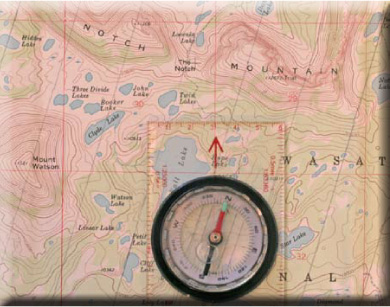
To simplify this on my map I take a geometry compass and a ruler and mark with a pencil the magnetic north lines. In this example they are all parallel and take into account the 16° to the east of grid north. On the geometry compass, 0° is grid north and from there the ruler is set at the declination of 16° to the east. The first penciled line is placed. After the first line is drawn the rest of the lines are made parallel, spaced by the width of the ruler. Now my map has the magnetic north lines in place. This makes orienting the compass to the map fast and simple. The map is preprinted with the grid north lines.
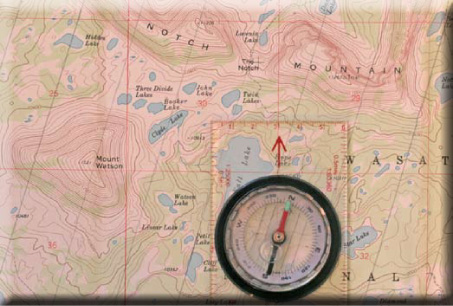
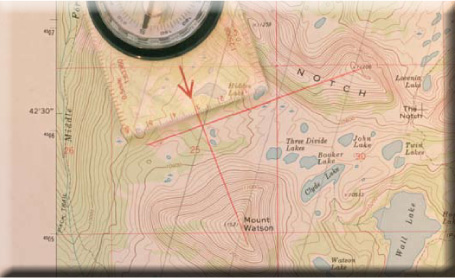
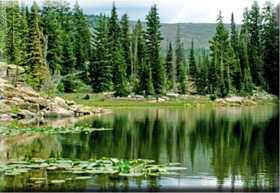
For example: to find the direction of a difficult spot on this map which is Hidden Lake, I orient north on the compass and north on its needle towards the magnetic pencil lines. I do this by moving the map and the compass needle and north marking on the compass dial to magnetic north. Next the red arrow of the compass’s base is directed to Hidden Lake. Now this red arrow is my direction of travel. Now I visually sight a landmark off into the distance that this arrow is pointing to. Now I hike over to that landmark. Once there I repeat this procedure by pointing to another landmark and traveling to it. Repeating this process I can estimate how far Hidden Lake is from me. I use my watch as an estimate of distance travel. For example, over rough terrain I usually average two miles per hour and smooth terrain 3 ½ - 4 miles per hour. My timed hiking tells me I’m close to Hidden Lake but I still can’t see it. So now I study the topographical map for two prominent land marks which must be clearly visible and precisely marked on the map. I’ve chosen the peak of Mount Watson. Now I orient the red arrow of the compass towards the peak of Mount Watson. I’ve red-penciled on the map a line towards it from my location. Next I pick the second landmark. This time it’s the prominent peak on Notch

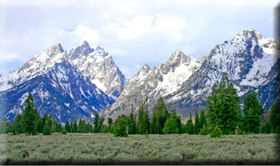
Mountain. Again I pencil in a red line towards its peak. All along I’ve oriented the compass’s needle and dials north towards the magnetic north marking on the map. Now where these two red lines intersect is my present location. This process is called triangulation. Now I compare my present location with Hidden Lake on the map. Now I simply change my hiking direction and go directly towards Hidden Lake. I’ve found that the Hidden Lakes are aptly named on the maps. They usually require trial and error to find. Triangulation is the method of choice in finding your present location. I love finding the Hidden Lakes, not only for the challenge, but because they provide solitude and quality fishing. Much of the time I don’t use a compass when hiking in an area with prominent landmarks. I use the map’s contour lines which draw a three dimensional shape that relates to the actual physical features. It’s easy to spot the rounded hill that is next to your destination, or the majestic peak that visually sites your location in relation to the peak. A prominent mountain range that runs north and south makes it easy to find your destination. But when you’re hiking during bad weather with limited visibility, these landmarks are obscured. Now you must constantly use your compass for direction. Hiking in heavily forested or featureless flat areas can make it difficult to find your way. It is in these places you can get lost. Here you must constantly rely on the map and compass to maintain your course.
If somehow you become lost, it’s easy to tell your direction in the early morning or evening. Simply remember that the sun rises in the east and sets in the west. So if you are lost you can establish the basic directions in the morning and evening. At night the front edge of the big dipper points to the North Star, so on a clear night you can establish your basic bearings.
There are other natural signs to help with your directions. Trees can tell you which way is north. There are fewer leaves and branches towards the north. It’s easier to notice if you look upwards on the trunk of the tree. Also the north face of the tree has more shade and correspondingly plants such as moss and lichen grow more readily on the tree’s north side. Ants prefer to build their nests on the south side of a tree. Observing snow melting patterns can also aid in finding your directions. In the spring the snow melts more on the south face of large rocks or on south facing slopes. Vegetation grows thicker on south facing slopes because of the increase in sunshine. However, these methods can be unreliable because heavy winds can alter the snow pack conditions. But by using all of these natural signs together, you can decide the directions.
Planning hikes can be an enjoyable activity. I would rather get out my map and plan my trip than watch television. I look to see how my destination will be best reached. I note the map’s landmarks and write down the distances and elevations to be gained. There are published guide books for nearly every major wilderness area that make for quality reading. I use them to help plan my next adventure so I am prepared to go on my hike. I know where I’m going and the best course of travel. I write down my itinerary and leave it with a friend. If I’m not home in time it may become a valuable aid in my rescue.
Several years ago I became lost. At first I could feel the desperate panic of the situation. I was frustrated because I had planned my trip in detail. My destination was a hidden lake only about a mile off the established trail. I had to use a compass to find the lake and I had fished about 200 yards of its shoreline. This shoreline
was too rough to walk back along it to my original arrival point. I just subtracted 180° from my incoming bearing path and started to hike back towards the trail parallel to my incoming path. I thought that this would work. I overshot the trail because I crossed it on a rocky area where it was poorly marked. This trail was only marked in the vegetated areas. My watch told me I should have come to this trail about 20 minutes earlier. I had overshot my destination by about ¾ mile. I could see the landmarks, but I really needed the trail to make my hike back to the trail head. A tramp through this rough country would be arduous and would add several hours to my hike. So I desperately needed to find this trail. I sat under a large tree to allow the panic to pass. Then I stubbornly decided to think through this problem. I walked back in the direction I had come for about 20 minutes; I found a large tree and hiked concentric widening circles around it. Several circles later I found my trail. I made certain which direction on the trail I should travel. My trip back on the trail became a pleasure.
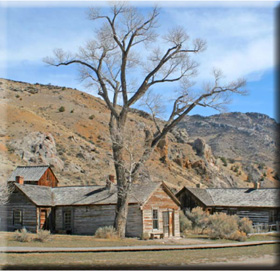
While I was lost I stumbled onto an old mining cabin and its tailings. This cabin had deteriorated and its roof had long ago caved in. To my surprise it was loaded with old tools. These tools were forged by a blacksmith and not commercially made. Later I traced their origin to a blacksmith’s shop in Salt Lake City. They were made in about 1860. I did not disturb any of the tools and left them in place because of their historic value. I only took photos. I even panned some of the tailings
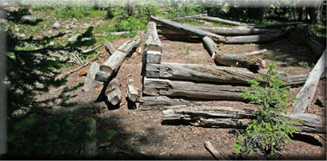

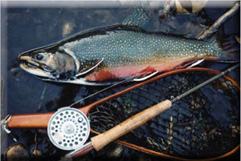
with a makeshift pan and they were loaded with flour gold. The tailings pile was a gold mine in itself. I left it in its original condition. I have a secret place to enjoy with historic significance. Now I have both an excellent place to fish for brook trout and a place to pan for gold, so getting lost became a plus. If you get lost, sit out the panic and use your head. Think your way through the problem.
Camping Adventures • Dutch Oven Cooking • Sports Knots
Fly Tying • Freshwater Fishing • Fly Fishing