If you ever find yourself in the great outdoors without a tent or some form of shelter, you’ll need to make your own. In some situations, you may just be able to camp out on the ground or find some natural shelter. However, nature can sometimes threaten your safety if you’re unable to find an adequate shelter. Armed with the ability to build your own shelter in different environments, you’ll be much more equipped for survival.
The Lean-To Shelter – Wooded Areas
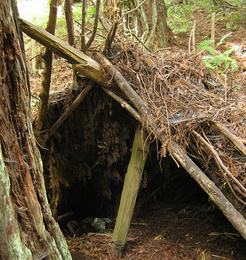
 The lean-to shelter is one of the easiest shelters to build yourself. It will provide you decent coverage from the wind and rain, and give you an extra barrier of defense against wild animals. To get started, you’ll need to find a downed tree. If you can’t find one, get the largest branch you can lift and brace it up against a standing tree at a 45 degree angle. The tree, branch and ground should form a triangle. The branch will act as the center beam of your lean-to shelter.
Next, gather smaller branches and lean them up against the center branch. Depending on how long you plan on staying, you may want to dig the branches into the ground and push them up against the center branch for increased stability. Lean up as many branches as you need to in order to form the combined roof and walls of your lean-to shelter.
Once your walls and roof are completed, you’ll want to add some extra coverage to keep out the elements. Look for smaller branches that still have some leaves on them, or any sort of brush you can find. Weave these pieces into the walls of your shelter until it looks like you have enough coverage.
This simple shelter can provide some great insulation and serve as a nice camping spot for one or more people, depending on how big you make it. It’s ideal in a wooded area where branches and leaves are readily available. It can also be a great project for you and your family or a team building exercise when trolling through the woods.
Beach Shelter
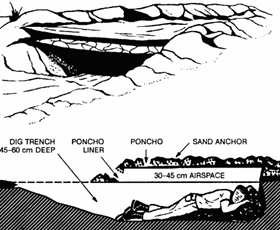
 If you’re stuck on a beach, you’ll be surrounded by lots of sand, but will also likely have some access to driftwood, small bushes and maybe even some trees. Since sand is easy to dig in, you should be able to handle this one on your own. Start by digging a trench large enough to lay down in and build up 3 walls around it.
Lay any driftwood you can find across the top to form a roof. Make sure the sand forming the walls is compacted enough that the beams can lay comfortably across the top. Gather any sort of leaves or shrubbery you can find and lay it across the roof beams. You can also use the foliage to make the ground inside the shelter a little softer for you to sleep in.
Since you can be exposed to lots of sun on the beach, this shelter is especially important to providing you with shade. Staying out of the sun will keep you hydrated longer and conserve your energy, as well as protect you from a potentially bad sunburn and debilitating heat stroke.
Desert Shelter
In a desert, you will find your access to trees and foliage much more limited than on a beach. You’ll have to make due with what you have and pay special attention to your surroundings to find natural shelters to help you out. Look for rock outcroppings that form natural trenches so that you have a base to build from.
 Pile up sand around the rocks for more insulation from the elements. If you have a poncho, canvas or any other sort of liner, use that as your roof. Secure it with rocks or sand on the edges, making sure you leave enough room for you to easily get in and out of the shelter. If you don’t have any materials with you, you’ll need to start foraging for supplies. Use anything you can find to form a roof – leaves, brush, sticks or any of nature’s gifts. Without a roof, your shelter is all but useless.
Deserts are known for their extreme temperature variations – blazing hot during the day and cold at night. A desert shelter will help insulate you from these temperatures and prolong your survival.
Snow Shelter
Due to the extremely low temperatures and sometimes-fierce winds, survival in snowy conditions can be particularly tricky. Shelter is absolutely essential in a snowy region and even more so during a snowstorm.
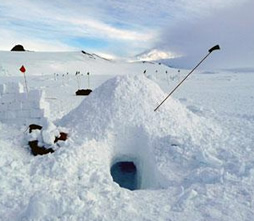
 With any snow shelter, be prepared to dig and use up a lot of energy. If you don’t have a shovel, use whatever you can find to do the digging to avoid using your hands. Start by clearing out a circular area around 8 feet in diameter. Pile snow on top of that until you get to a height of around 6 feet. Make sure you mix the snow in the process – mixing snow from different layers helps to make it stronger because of the different temperatures.
Once the snow has sufficiently hardened (typically an hour or two), start digging out a cave from one of the sides and into the middle. Hollow it out until there is enough room for you to lay down with a little bit of extra space.
Make sure you poke some ventilation holes throughout the shelter so that a sufficient amount of fresh air is getting in. Mark the shelter with sticks, ski poles or anything else to keep it visible. If you leave your shelter and it continues to snow, you can easily lose it if it’s not clearly marked.
A few feet outside of your entrance, build up another pile of snow to form a wall. This is known as a “wind wall” and will help keep the wind and any other snow from blowing inside your shelter.
Sources:
- Lean-to Shelter image – graymalkn
- Beach Shelter & Desert Shelter images- Survival Junction
- Snow Shelter image – Uncooped

